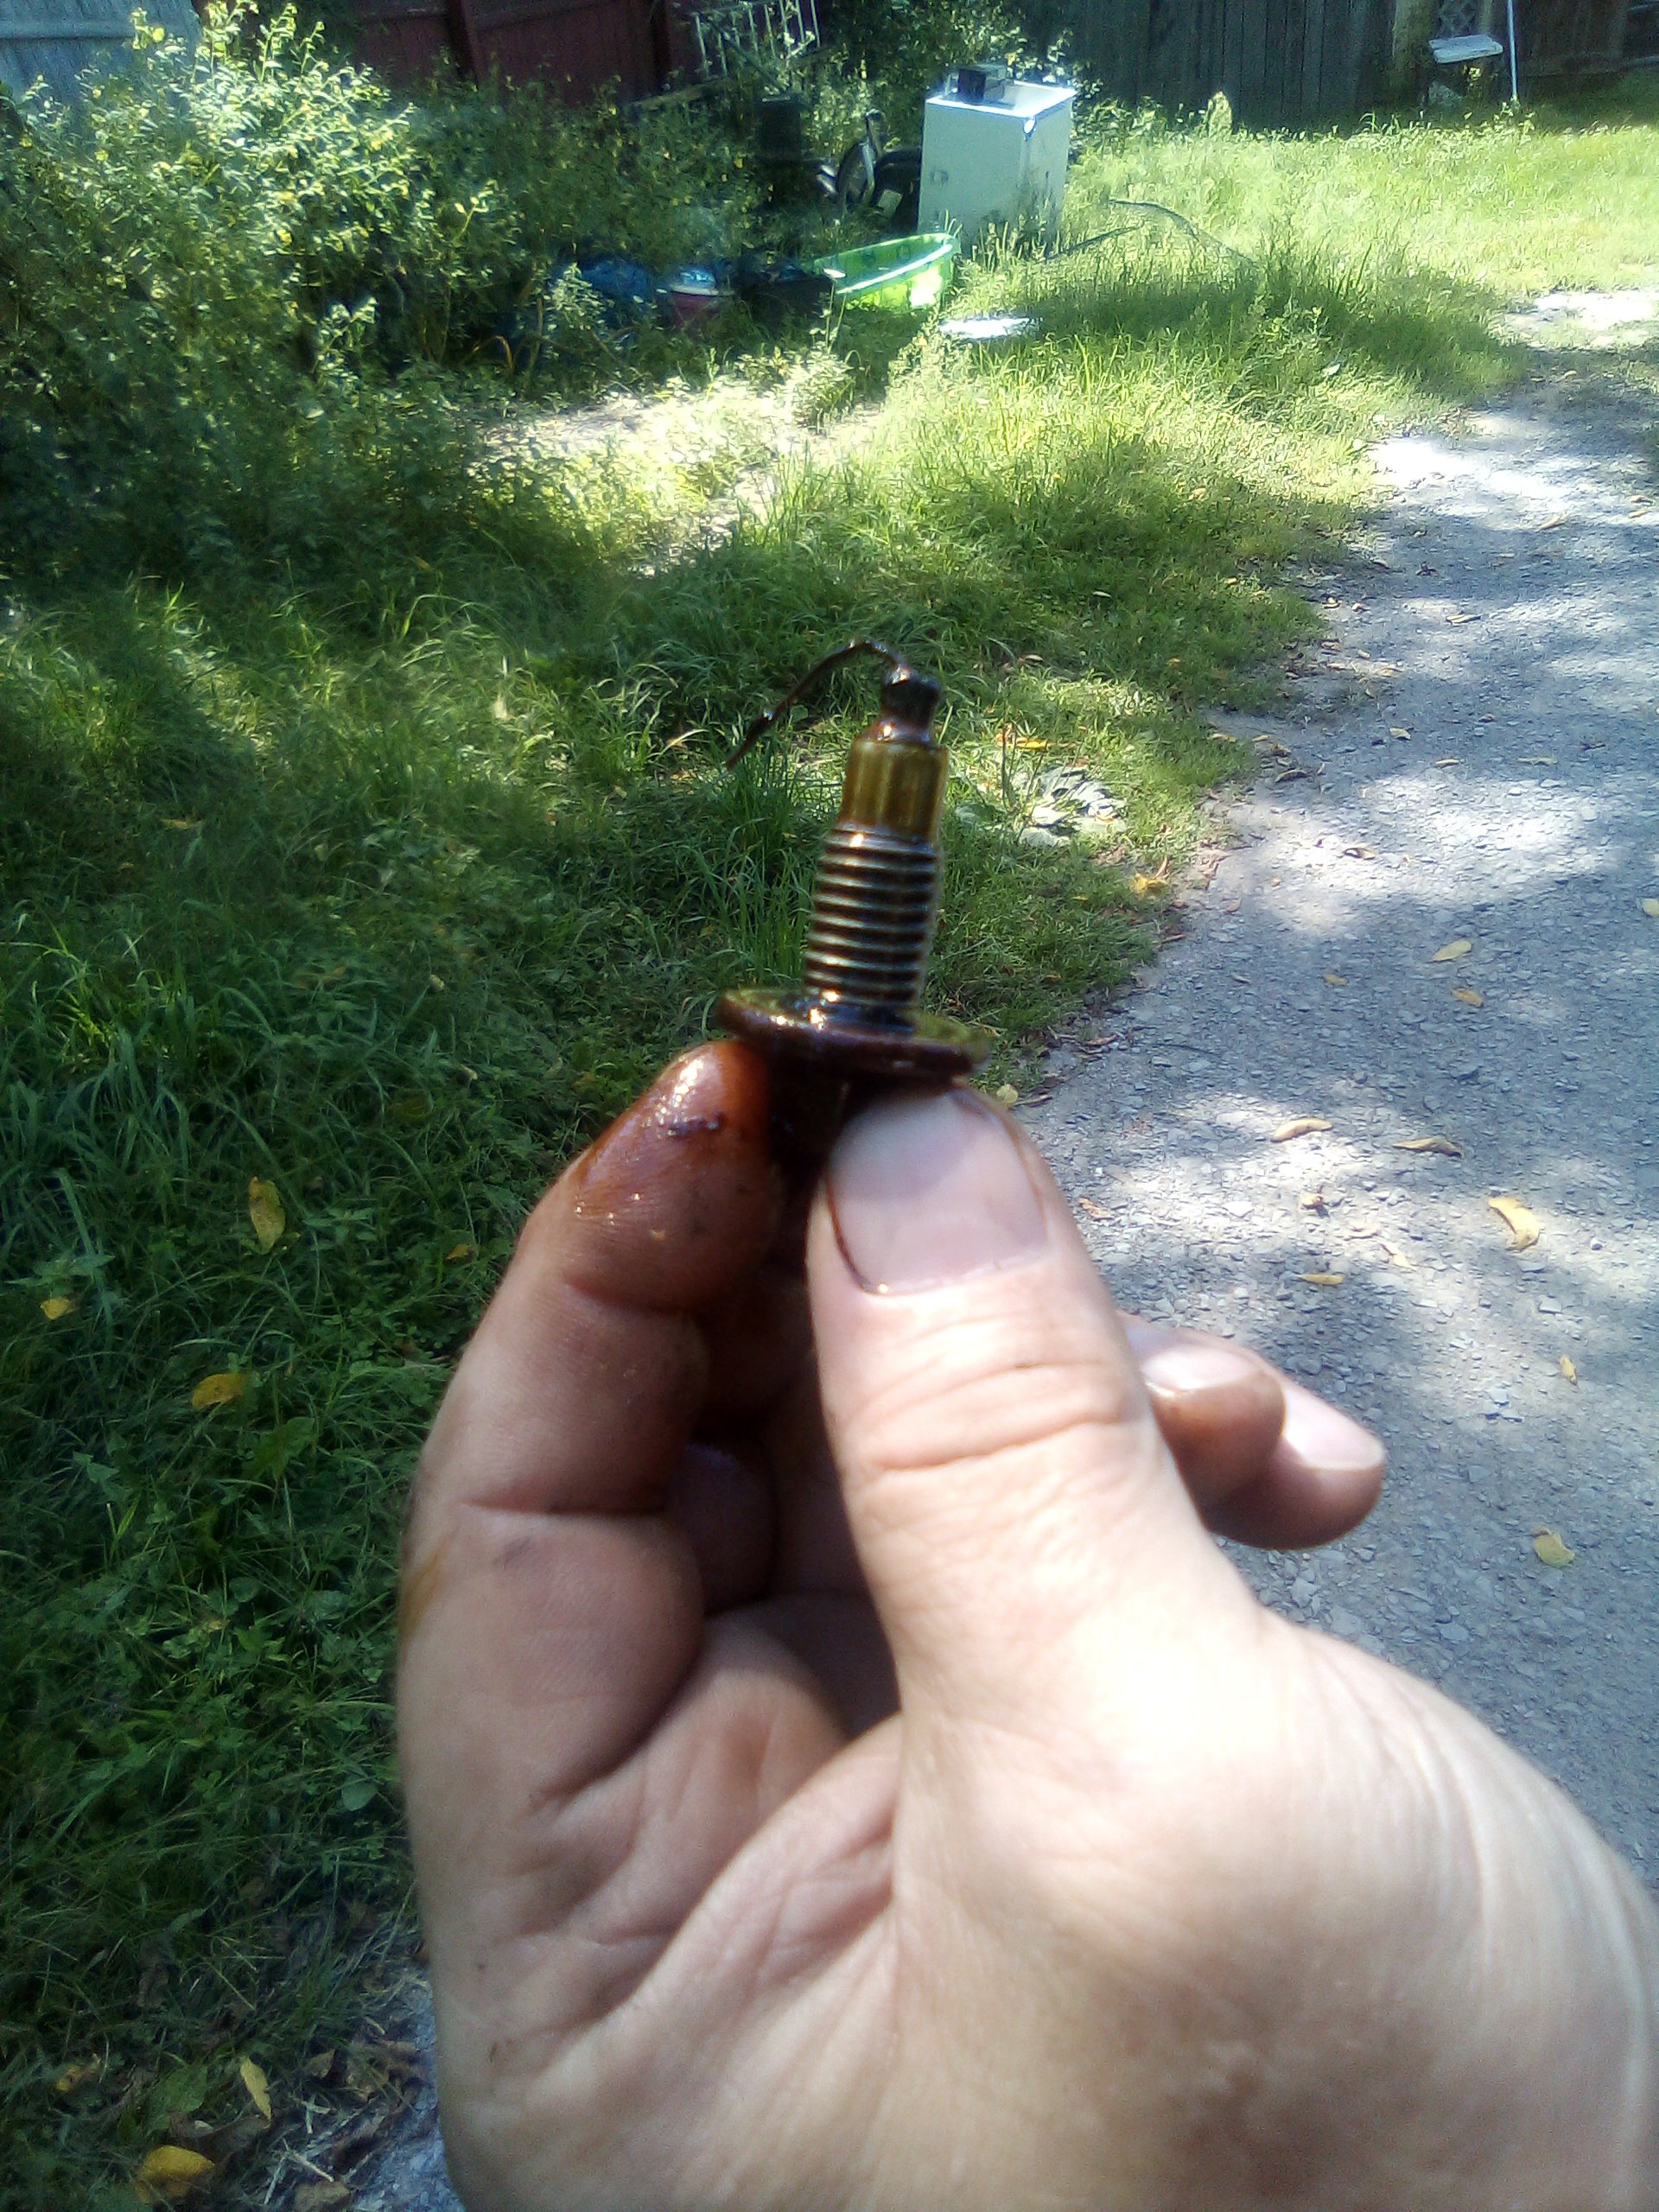
Doing an oil change and found this.
Proof that magnetized or magnet embedded stop plugs work.
Doing an oil change and found this.
Proof that magnetized or magnet embedded stop plugs work.
 I am often asked, “Why does it cost so much to fix my car?”
This is a question worth asking, especially if you’ve been given a repair quote that runs into the hundreds or even thousands of dollars.
In the past, the cost of car parts would rise with the rate of inflation. However, as our vehicles have become more complex, the parts have become more complex, and the materials they are made of have become more exotic. As a result, some parts have become very expensive.
When you get right down to it, the reason car repairs are so expensive is because everyone involved is trying to make a living. The parts supplier must manufacture the part. The parts distributor must inventory and supply the repair shops. The repair shop must charge a labor rate that will allow them to remain in business. The technicians must be paid an hourly wage that reflects their investment in training, certifications, and tools.
What’s not often passed onto the consumer are the costs of running a shop, which in this modern age, can be pricey. Regardless of size, a shop has expenses that have to be paid by the work generated. There are the obvious ones, like the rent, electricity, heat and other utilities.
Many shops carry their own parts inventory. Given the number of different years, makes, and models of vehicles on the road, this inventory must be broad. Sitting on this inventory is not cheap.
Well trained service personnel costs money, period. Usually, techs are classified as “A”, “B”, or “C” techs, and the more high-grade techs in a shop, the more it costs to pay them. In order to attract a high-grade technician these days, shops have to pay a good hourly rate or weekly salary. In addition, health insurance and other benefits such as a company car often go into the package to attract the class “A” technician.
These technicians have to go to school on a regular basis to keep up with new automotive technology. Without this training, techs cannot repair vehicles in the “book time” allotted for a particular service operation. (Not to mention the occasional “headache” job that comes along that every tech in town has had his/her hands on without success.) A repair shop usually pays for this training.
The last piece of the puzzle is the actual time the technician spends diagnosing and repairing the vehicle. The more complicated the vehicle system, the more difficult and time consuming it becomes to diagnose. While the onboard computers have some self-diagnostic capability, it is not as simple as “hooking up the machine to tell you what’s wrong.” Fault codes must be analyzed, computer data reviewed, and often times, specific electrical measurements must be taken from the affected system in order to determine the actual fault.
As you can see, there’s a lot more that goes into auto repair pricing than parts and labor.]]>
I am often asked, “Why does it cost so much to fix my car?”
This is a question worth asking, especially if you’ve been given a repair quote that runs into the hundreds or even thousands of dollars.
In the past, the cost of car parts would rise with the rate of inflation. However, as our vehicles have become more complex, the parts have become more complex, and the materials they are made of have become more exotic. As a result, some parts have become very expensive.
When you get right down to it, the reason car repairs are so expensive is because everyone involved is trying to make a living. The parts supplier must manufacture the part. The parts distributor must inventory and supply the repair shops. The repair shop must charge a labor rate that will allow them to remain in business. The technicians must be paid an hourly wage that reflects their investment in training, certifications, and tools.
What’s not often passed onto the consumer are the costs of running a shop, which in this modern age, can be pricey. Regardless of size, a shop has expenses that have to be paid by the work generated. There are the obvious ones, like the rent, electricity, heat and other utilities.
Many shops carry their own parts inventory. Given the number of different years, makes, and models of vehicles on the road, this inventory must be broad. Sitting on this inventory is not cheap.
Well trained service personnel costs money, period. Usually, techs are classified as “A”, “B”, or “C” techs, and the more high-grade techs in a shop, the more it costs to pay them. In order to attract a high-grade technician these days, shops have to pay a good hourly rate or weekly salary. In addition, health insurance and other benefits such as a company car often go into the package to attract the class “A” technician.
These technicians have to go to school on a regular basis to keep up with new automotive technology. Without this training, techs cannot repair vehicles in the “book time” allotted for a particular service operation. (Not to mention the occasional “headache” job that comes along that every tech in town has had his/her hands on without success.) A repair shop usually pays for this training.
The last piece of the puzzle is the actual time the technician spends diagnosing and repairing the vehicle. The more complicated the vehicle system, the more difficult and time consuming it becomes to diagnose. While the onboard computers have some self-diagnostic capability, it is not as simple as “hooking up the machine to tell you what’s wrong.” Fault codes must be analyzed, computer data reviewed, and often times, specific electrical measurements must be taken from the affected system in order to determine the actual fault.
As you can see, there’s a lot more that goes into auto repair pricing than parts and labor.]]>
brushless motors are concerned, you simply put the magnets on the part that spins. Put the electromagnetic windings on the outside, sort of like an alternator with a permanent magnet rotor, only you’re feeding the stator instead of harvesting its energy. The brushless AC motors in hybrid vehicle transmissions work in a similar fashion, but they’re fed by AC current from an inverter instead of DC. A brushless DC motor needs some electronics to make it work because you have to feed pulses to the external fixed windings in such a way that they’re timed with the north-south swapping of the permanent magnets built into the rotor. Thus, you’re taking the DC and turning it into AC inside the motor. Brushless DC motor electronics have to use a sensor keep up with where the rotor is at any given time, and a Hall-Effect sensor is typically used for that. Furthermore, because of the electronics, you can’t simply reverse the polarity of the current you feed a DC brushless motor and expect it to spin backward unless its electronics have been set up to work that way.
 |
 |
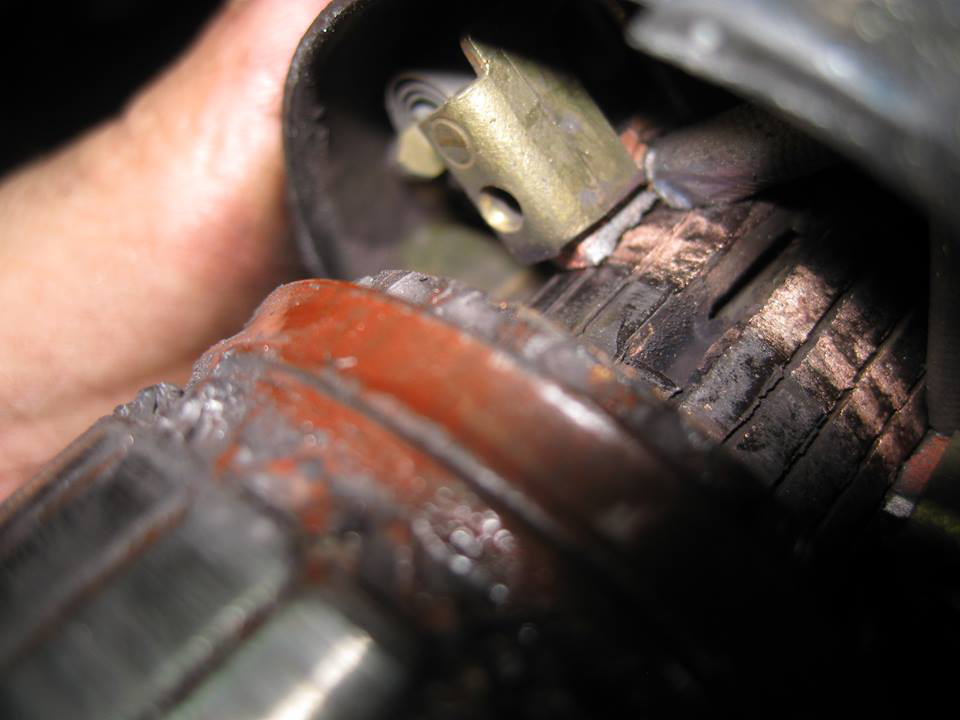 |
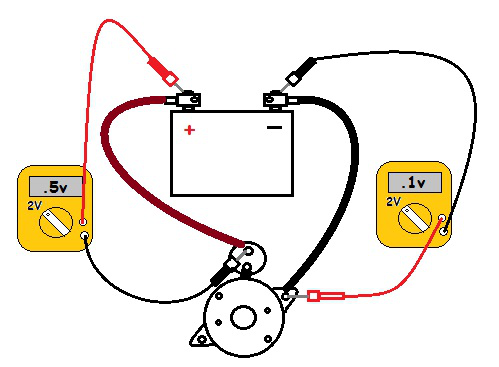
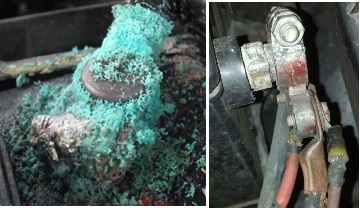
| This is a simple diagram of how voltage drop testing should be done. Just make sure the starter’s spinning when the measurements are taken, and be sure to include every suspect connection. The conventional wisdom is .1v or less on the negative side and .5v or less on the positive side. | Before any suspected starter issue is addressed, these types scenarios must be dealt with, and the battery itself must receive a clean bill of health as well. The side post adapter and its gaggle of connections (right) can drop disastrous amounts voltage. | Low voltage problems (due to voltage drop or a weak battery) can make short work of a once-healthy starter. This commutator was destroyed by repeated starts with a battery that had barely enough voltage to start the engine. |
When a Ford diesel pickup with a drivability problem rolls into your shop, do you have reservations about tackling the job? Source: A guide to Ford diesel diagnostics | Search Autoparts]]>