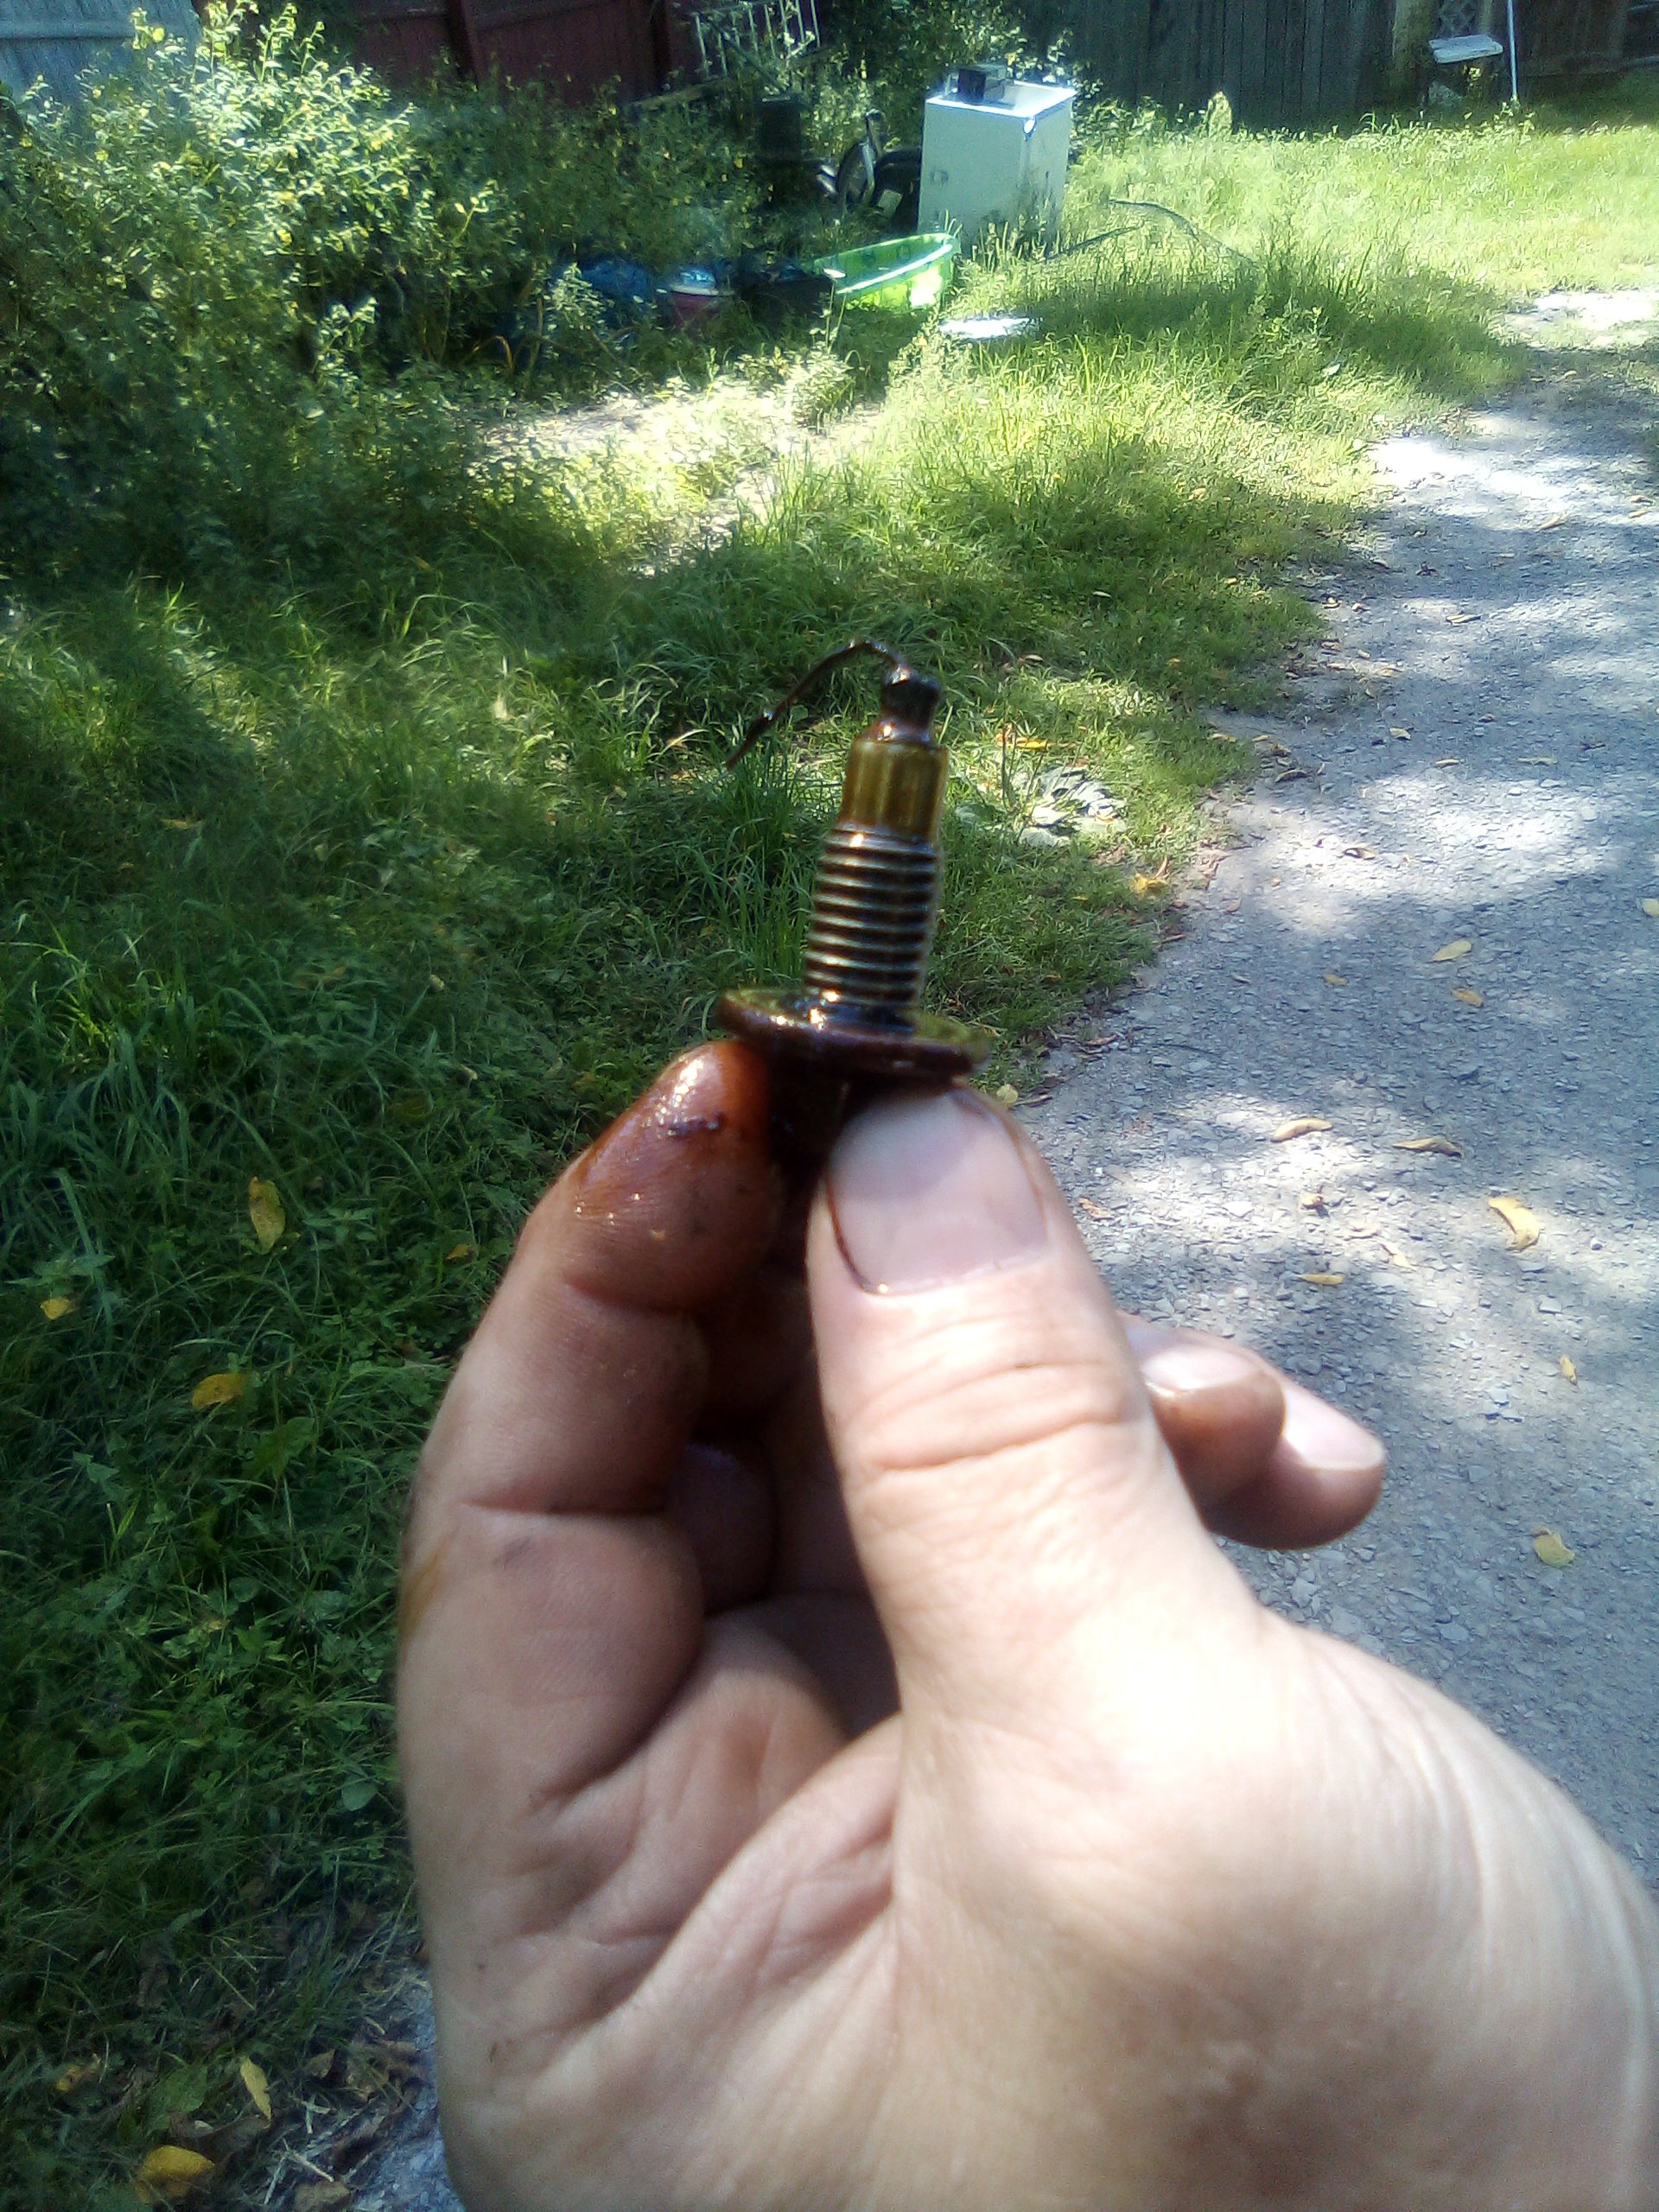
Doing an oil change and found this.
Proof that magnetized or magnet embedded stop plugs work.
Doing an oil change and found this.
Proof that magnetized or magnet embedded stop plugs work.
This is a repost from Wikipedia Automobile air conditioning (also called A/C) systems use air conditioning to cool the air in a vehicle. History A company in New York City in the United States first offered installation of air conditioning for cars in 1933. Most of their customers operated limousines and luxury cars. In 1939, Packard became the first automobile manufacturer to offer an air conditioning unit in its cars. These were manufactured by Bishop and Babcock Co, of Cleveland, Ohio. The “Bishop and Babcock Weather Conditioner” also incorporated a heater. Cars ordered with the new “Weather Conditioner” were shipped from Packard’s East Grand Boulevard facility to the B&B factory where the conversion was performed. Once complete, the car was shipped to a local dealer where the customer would take delivery. Packard fully warranted and supported this conversion, and marketed it well. However, it was not commercially successful for a number of reasons: ⦁The main evaporator and blower system took up half of the trunk space (though this became less of a problem as trunks became larger in the post-war period). ⦁It was superseded by more efficient systems in the post-war years. ⦁It had no temperature thermostat or shut-off ⦁ mechanism other than switching the blower off. (Cold air would still sometimes enter the car with any movement as the drive belt was continuously connected to the compressor—later systems would use electrically operated clutches to remedy this problem.) ⦁The several feet of plumbing going back and forth between the engine ⦁ compartment and trunk proved unreliable in service. ⦁The price, at US $274 ($4,692.12 in 2014 US dollars), was unaffordable to most people in post-depression/pre-war America. The option was discontinued after 1941. The 1953 Chrysler Imperial was one of the first production cars in twelve years to offer modern automobile air conditioning as an option, following tentative experiments by Packard in 1940 and Cadillac in 1941. Walter Chrysler had seen to the invention of Airtemp air conditioning in the 1930s for the Chrysler Building and had offered it on cars in 1941-42, and again in 1951-52. The Airtemp was more advanced than rival automobile air conditioners by 1953. It was operated by a single switch on the dashboard marked with low, medium, and high positions. As the highest capacity unit available at that time, the system was capable of quickly cooling the passenger compartment and also reducing humidity, dust, pollen, and tobacco smoke. The system drew in more outside air than contemporary systems; thus, reducing the staleness associated with automotive air conditioning at the time. Instead of plastic tubes mounted on the rear window package shelf as on GM cars, small ducts directed cool air toward the ceiling of the car where it filtered down around the passengers instead of blowing directly on them, a feature that modern cars have lost. Cadillac, Buick, and Oldsmobile added air conditioning as an option on some of their models in the 1953 model year. All of these Frigidaire systems used separate engine and trunk mounted components. Logo on a 1957 car with AMC factory installed air-conditioning system In 1954, the Nash Ambassador was the first American automobile to have a front-end, fully integrated heating, ventilating, and air-conditioning system. The Nash-Kelvinator Corporation used its experience in refrigeration to introduce the automobile industry’s first compact and affordable, single-unit heating and air conditioning system optional for its Nash models. This was the first mass market system with controls on the dash and an electric clutch. This system was also compact and serviceable with all of its components installed under the hood or in the cowl area. Combining heating, cooling, and ventilating, the new air conditioning system for the Nash cars was called the “All-Weather Eye”. This followed the marketing name of “Weather Eye” for Nash’s fresh-air automotive heating and ventilating system that was first used in 1938. With a single thermostatic control, the Nash passenger compartment air cooling option was “a good and remarkably inexpensive” system. The system had cold air for passengers enter through dash-mounted vents. Nash’s exclusive “remarkable advance” was not only the “sophisticated” unified system but also it’s $345 price that beat all other systems. Most competing systems used a separate heating system and an engine-mounted compressor, driven by the engine crankshaft via a belt, with an evaporator in the car’s trunk to deliver cold air through the rear parcel shelf and overhead vents. General Motors made a front-mounted air conditioning system optional in 1954 on Pontiacs with a straight-eight engine that added separate controls and air distribution. The alternative layout pioneered by Nash “became established practice and continues to form the basis of the modern and more sophisticated automatic climate control systems.” Air-conditioning for automobiles came into wide use from the late twentieth century. Although air conditioners use significant power; the drag of a car with closed windows is less than if the windows are open to cool the occupants. There has been much debate on the effect of air conditioning on the fuel efficiency of a vehicle. Factors such as wind resistance, aerodynamics and engine power and weight must be considered, to find the true difference between using the air conditioning system and not using it, when estimating the actual fuel mileage. Other factors can affect the engine, and an overall engine heat increase can affect the cooling system of the vehicle. The innovation was adopted quickly and new features to air conditioning like the Cadillac Comfort Control which was a completely automatic heating and cooling system set by dial thermostat was introduced as an industry first in the 1964 model year. By 1960 about 20% of all cars in the U.S. had air-conditioning, with the percentage increasing to 80% in the warm areas of the Southwest. American Motors made air conditioning standard equipment on all AMC Ambassadors starting with the 1968 model year, a first in the mass market, with a base price starting at $2,671. By 1969, 54% of domestic automobiles were equipped with air conditioning, with the feature needed not only for passenger comfort but also to increase the car’s resale value. A car cooler A car cooler is an automobile window-mounted evaporative cooler, sometimes referred to as a swamp cooler. It was an early type of automobile air conditioner and is not used in modern cars. To cool the air it used latent heat (in other words, cooling by water evaporation). Water inside the cooler evaporates and in the process transfers heat from the surrounding air. The cool moisture-laden air is directed to the inside of the car. The lower the humidity, the better the system works. Because of the dry desert air, car coolers were popular in the southwestern United States states of California, Arizona, Texas, New Mexico, and Nevada. Chrysler Airtemp The 1953 Chrysler Imperial was one of the first production cars in twelve years to offer modern automobile air conditioning as an option, following tentative experiments by Packard in 1940 and Cadillac in 1941. Walter Chrysler had seen to the invention of Airtemp air conditioning in the 1930s for the Chrysler Building and had offered it on cars in 1941-42, and again in 1951-52. The Airtemp was more advanced than rival automobile air conditioners by 1953. It was operated by a single switch on the dashboard marked with low, medium, and high positions. As the highest capacity unit available at that time, the system was capable of quickly cooling the passenger compartment and also reducing humidity, dust, pollen, and tobacco smoke. The system drew in more outside air than contemporary systems; thus, reducing the staleness associated with automotive air conditioning at the time. Instead of plastic tubes mounted on the rear window package shelf as on GM cars, small ducts directed cool air toward the ceiling of the car where it filtered down around the passengers instead of blowing directly on them, a feature that modern cars have lost. Cadillac, Buick, and Oldsmobile added air conditioning as an option on some of their models in the 1953 model year. All of these Frigidaire systems used separate engine and trunk mounted components. Growth in demand Air-conditioning for automobiles came into wide use from the late twentieth century. Although air conditioners use significant power; the drag of a car with closed windows is less than if the windows are open to cool the occupants. There has been much debate on the effect of air conditioning on the fuel efficiency of a vehicle. Factors such as wind resistance, aerodynamics and engine power and weight must be considered, to find the true difference between using the air conditioning system and not using it, when estimating the actual fuel mileage. Other factors can affect the engine, and an overall engine heat increase can affect the cooling system of the vehicle. Evaporative cooling A car cooler A car cooler is an automobile window-mounted evaporative cooler, sometimes referred to as a swamp cooler. It was an early type of automobile air conditioner and is not used in modern cars. To cool the air it used latent heat (in other words, cooling by water evaporation). Water inside the cooler evaporates and in the process transfers heat from the surrounding air. The cool moisture-laden air is directed to the inside of the car. The lower the humidity, the better the system works. Because of the dry desert air, car coolers were popular in the southwestern United States states of California, Arizona, Texas, New Mexico, and Nevada. Operating principles See also: Refrigeration cycle A simple stylized diagram of the refrigeration cycle: 1) condensing coil, 2) expansion valve, 3) evaporator coil, 4) compressor In the refrigeration cycle, heat is transported from the passenger compartment to the environment. A refrigerator is an example of such a system, as it transports the heat out of the interior and into its environment (i.e. the room). Circulating refrigerant gas vapor enters the gas compressor in the engine bay and is compressed to a higher pressure, resulting in a higher temperature as well. The hot, compressed refrigerant vapor is now at a temperature and pressure at which it can be condensed and is routed through a condenser, usually in front of the car’s radiator. Here the refrigerant is cooled by air flowing through the condenser coils and condensed into a liquid. Thus, the circulating refrigerant rejects heat from the system and the heat is carried away by air. The condensed and pressurized liquid refrigerant is next routed through a thermal expansion valve where it undergoes an abrupt reduction in pressure. That pressure reduction results in flash evaporation of a part of the liquid refrigerant, lowering its temperature. The cold refrigerant is then routed through the evaporator coil in the passenger compartment. The air (which is to be cooled) blows across the evaporator, causing the liquid part of the cold refrigerant mixture to evaporate as well, further lowering the temperature. The warm air is therefore cooled. To complete the refrigeration cycle, the refrigerant vapor is routed back into the compressor. The compressor can be driven by the car’s engine (e.g. via a belt) or by an electric motor. Power consumption In a modern automobile, the A/C system will use around 4 horsepower (3 kW) of the engine’s power, thus increasing fuel consumption of the vehicle. source – Wikipedia ]]>
What is an evap leak
An EVAP leak is a fault in the evaporative emission control system (EVAP). It means a leak has been detected. The (EVAP) emission control system prevents the escape of fuel vapors from a vehicle’s fuel system. Fuel vapors are routed by hoses to a charcoal canister for storage. This keeps air pollution down and keeps the smell of fuel from reaching the inside of your vehicle
In the golden age of automotive manufacturing, engineers didn’t need to concern themselves with trivial design aspects such as containing fuel vapor. Evaporating fuel from the gas tank was simply vented to the atmosphere. Then along came the 1970s, bringing bell bottoms and the first steps toward environmental control systems. We were just figuring out that evaporated fuel was not so good for the environment. Hence the need for modern designs to capture, store and redistribute fuel vapor.
So we have the evaporative emission control system (EVAP) while the engine is running, and under predetermined circumstances, the stored, evaporated vapor is moved from the charcoal canister back to be slowly burned by the engine. This is called the purge system. Multiple sensors monitor the purge system as well as looking for leaks. There are large leaks such as a loose gas cap and there are small leaks such as a cracked canister or delivery hose.
The most common cause of an EVAP leak warning, or the Check Engine Light, is the gas cap not being closed properly. If the cap is not fully tightened or closed all the way, the Check Engine Light may come on.
If the gas cap is on correctly, there may be a more serious issue, such as a leak in the fuel system. Other issues could be a faulty vent o-ring seal, defective leak detection pump, defective purge valve, or another small leak somewhere in the EVAP system.
Why should I fix it
There are municipalities that require your car pass emission testing and even if you’re not required to pass testing there are the safety reasons for getting the leak fixed the vapors can and do get inside the car which can make you sickFuel vapors are emitted from the vehicle any time there is gasoline in the tank. So if you have a leak, even if you are not driving the vehicle, those vapors are polluting the air 24 hours a day. Uncontrolled emissions like this account for about 20 percent of the pollution produced by vehicles.
Is my car safe to drive with an evap leak
While it is safe to drive with an EVAP leak, you should get the leak repaired right away. If your Check Engine Light comes on, check to make sure the gas cap on your vehicle is securely fastened. If that doesn’t solve the problem, contact a shop or a mobile technician to inspect the EVAP system. It takes a professional to troubleshoot and repair an EVAP leak.
]]>
It’s just a fact of life — we are living longer. And it’s not just because of tofu, sunscreen, and medical breakthroughs. Automakers are to thank (or curse) for this as much as doctors since they are competitively blending performance and creature comforts with cutting-edge safety technology that tries to stay one step ahead of you — and everyone else on the road.
Car safety technology has advanced considerably since the earliest models of automobiles were created. In the early 1900s when the Ford Model-T came into existence, there was not much thought put into the probability the vehicle would be involved in a crash, thus safety standards were low or nonexistent.
Still years later, the interior of popular cars seemed to be designed with aesthetics in mind over the safety of their occupants. According to data from the National Transportation Highway Safety Administration (NHTSA), in 1966, the United States saw almost 51,000 fatalities due to auto accidents, while in 2012 the numbers have dropped considerably to just over 25,000 fatalities.
Much of this decrease in automobile-related deaths can be attributed to the invention, promotion, and use of different types of safety devices that cars have been fitted with over the years. Step into a 2017 model vehicle and you are likely to see standard safety features like airbags, 3-point seatbelts, anti-lock braking systems and even automatic parking capabilities, all of which serve one purpose: to keep the vehicle’s occupants safe.Below are just a few of the safety systems you’ll find in today’s cars.
1. Tire-pressure monitoring The National Highway Traffic Safety Administration has required that all U.S. passenger vehicles weighing 10,000 pounds or less be equipped with a tire-pressure monitoring system by the 2008 model year. But it’s already a safety feature in most new autos. Sensors at the wheels are able to alert you if the air pressure is too low by an audible warning, a light on the instrument panel, or both. You may also see more cars with run-flat, which allow a vehicle to continue to run at a relatively high rate of speed for 50-plus miles.
2. Adaptive cruise control/collision mitigation Modern cruise control goes beyond just maintaining a constant speed. Thanks to sensors and the use of radar, cruise control can now adjust the throttle and brakes to keep a safe distance from the vehicle in front of you if there are changes in traffic speed or if a slowpoke cuts in. If the system senses a potential collision, it typically will brake hard and tighten the seatbelts. Once it knows the lane is clear or traffic has sped up, it will return your car to its original cruising speed, all without your input. Of course, you may override the system by touching the brakes.
3. Blind-spot detection/side assist/collision warning This technology is designed to alert you to cars or objects in your blind spot during driving or parking, or both. Usually, it will respond when you put on your turn signal; if it detects something in the way, it may flash a light in your mirror, cause the seat or steering wheel to vibrate, or sound an alarm. This is more of a short-range detection system.
4. Lane-departure warning/wake-you-up safety This is similar to blind-spot/side-assist technology but with more range. It judges an approaching vehicle’s speed and distance to warn you of potential danger if you change lanes. It can also warn if it determines your car is wandering out of the lane, which could be useful if you become distracted. This could come in the form of a vibration through the seat or steering wheel, or an alarm. Down the road expect the lane-departure warning to even be able to monitor body posture, head position and eye activity to decide if the driver is falling asleep and the vehicle is behaving erratically. At that point, the system may even be capable of slowing the car down and engaging stability control. Just in case.
5. Rollover prevention/mitigation Most automakers offer an electronic stability control system, and some offer a preparation system (seat belts tighten, roll bars extend). However, what we’re talking about is more intelligent than that. If the system senses a potential rollover (such as if you whip around a corner too fast or swerve sharply), it will apply the brakes and modulate throttle as needed to help you maintain control. DaimlerChrysler calls it Electronic Roll Mitigation, Ford named it Roll Stability Control, and GM’s is Proactive Roll Avoidance. Range Rover’s is Active Roll Mitigation, while Volvo’s is called Roll-Over Protection System. But they all have the same goal.
6. Occupant-sensitive/dual-stage airbags All humans are not created equal, and airbags are evolving to compensate in the form of low-risk, multistage and occupant-sensitive deployment. Technology can now sense the different sizes and weights of occupants as well as seatbelt usage, abnormal seating position (such as reaching for the radio or bending to pick something off the floor), rear-facing child seats and even vehicle speed. While the driver, passenger and side curtain airbags are nothing new, sensing airbags are popping up (so to speak) everywhere.
7. Emergency brake assists/collision mitigation This brake technology is different from an anti-lock braking system or electronic brakeforce distribution, in that it recognizes when the driver makes a panic stop (a quick shift from gas to the brake pedal) and will apply additional brake pressure to help shorten the stopping distance. It may also work in conjunction with the smart cruise control or stability control system in some vehicles if it senses a potential collision. It is often called brake assist, although BMW, for example, refers to it as Dynamic Brake Control.
8. Adaptive headlights and/or night-vision assist Night vision can be executed in different forms, such as infrared headlamps or thermal-imaging cameras. But no matter the science, the goal is the same: to help you see farther down the road and to spot animals, people or trees in the path — even at nearly 1,000 feet away. An image is generated through a cockpit display, brightening the objects that are hard to see with the naked eye. Adaptive headlights follow the direction of the vehicle (bending the light as you go around corners). They may also be speed-sensitive (changing beam length or height) or compensate for ambient light. 9. Rearview camera Rearview cameras not only protect your car but also protect children and animals from accidental back-overs. Backing up your car has graduated from side mirrors tilting down or causing chirps and beeps to real-time viewing. New-school tech involves a camera that works with the navigation system to provide a wide-open shot of what’s happening behind you to help with parking or hooking up a trailer. 10. Emergency response There are a variety of ways vehicles now and in the future will handle an emergency situation. For example, Daimler Chrysler’s Enhanced Accident Response System (EARS) turns on interior lighting, unlocks doors and shuts off fuel when airbags deploy, while Volkswagen’s also switches on the hazards and disconnects the battery terminal from the alternator. In addition, GM’s OnStar and BMW Assist both alert their respective response centers of the accident and make crash details available to emergency personnel.Why do we need them?
Well the short answer: distracted irresponsible drivers and drivers who do not understand the power of the machine operating or just plain driver complacency
It’s no secret that drivers face more distractions on the road than ever before. In fact, each day in the U.S., over eight people are killed and 1,161 are injured in crashes that are reported to involve a distracted driver, according to data from 2013 by the National Highway Traffic Safety Administration.
The reality is everyone is a human being. Everyone has experienced some type of distraction in addition to cell phone usage, distractions on the road can also be related to rubbernecking, eating and drinking, and tuning the radio.
Safe cars don’t do the driver’s job for him. They provide good visibility, promote alertness, respond immediately to driver inputs (instead of suggesting them) to avoid potential accidents, and keep occupants alive when all else fails and doom looms.
Ultimately, it’s your butt on the line when you get into a car, and it’s you who is responsible for it and the butts of those around you on the road. Although the aforementioned features, and countless others developed since man first relieved horse with horsepower, no doubt save lives, the most important safety feature in any car is the one with the steering wheel in its hands and the pedals underfoot.
Pay attention when you drive. Note changing road conditions. Watch what other drivers are doing. Note who’s agitated, who’s cognitively antiquated, who’s just plain stupid. Don’t text while you drive. Don’t drive when you’ve been drinking. Be considerate. Keep right except to pass. Drive at a speed appropriate for conditions. All simple pieces of advice, all categorically ignored by most people who have been driving for more than a few years. All could potentially prevent countless accidents, injuries, and deaths every year, and all are 100 percent the responsibility of the person behind the wheel. Check all the boxes you want on your order sheet; they’re not going to make you a better driver. Using your brain will.
]]>
 I am often asked, “Why does it cost so much to fix my car?”
This is a question worth asking, especially if you’ve been given a repair quote that runs into the hundreds or even thousands of dollars.
In the past, the cost of car parts would rise with the rate of inflation. However, as our vehicles have become more complex, the parts have become more complex, and the materials they are made of have become more exotic. As a result, some parts have become very expensive.
When you get right down to it, the reason car repairs are so expensive is because everyone involved is trying to make a living. The parts supplier must manufacture the part. The parts distributor must inventory and supply the repair shops. The repair shop must charge a labor rate that will allow them to remain in business. The technicians must be paid an hourly wage that reflects their investment in training, certifications, and tools.
What’s not often passed onto the consumer are the costs of running a shop, which in this modern age, can be pricey. Regardless of size, a shop has expenses that have to be paid by the work generated. There are the obvious ones, like the rent, electricity, heat and other utilities.
Many shops carry their own parts inventory. Given the number of different years, makes, and models of vehicles on the road, this inventory must be broad. Sitting on this inventory is not cheap.
Well trained service personnel costs money, period. Usually, techs are classified as “A”, “B”, or “C” techs, and the more high-grade techs in a shop, the more it costs to pay them. In order to attract a high-grade technician these days, shops have to pay a good hourly rate or weekly salary. In addition, health insurance and other benefits such as a company car often go into the package to attract the class “A” technician.
These technicians have to go to school on a regular basis to keep up with new automotive technology. Without this training, techs cannot repair vehicles in the “book time” allotted for a particular service operation. (Not to mention the occasional “headache” job that comes along that every tech in town has had his/her hands on without success.) A repair shop usually pays for this training.
The last piece of the puzzle is the actual time the technician spends diagnosing and repairing the vehicle. The more complicated the vehicle system, the more difficult and time consuming it becomes to diagnose. While the onboard computers have some self-diagnostic capability, it is not as simple as “hooking up the machine to tell you what’s wrong.” Fault codes must be analyzed, computer data reviewed, and often times, specific electrical measurements must be taken from the affected system in order to determine the actual fault.
As you can see, there’s a lot more that goes into auto repair pricing than parts and labor.]]>
I am often asked, “Why does it cost so much to fix my car?”
This is a question worth asking, especially if you’ve been given a repair quote that runs into the hundreds or even thousands of dollars.
In the past, the cost of car parts would rise with the rate of inflation. However, as our vehicles have become more complex, the parts have become more complex, and the materials they are made of have become more exotic. As a result, some parts have become very expensive.
When you get right down to it, the reason car repairs are so expensive is because everyone involved is trying to make a living. The parts supplier must manufacture the part. The parts distributor must inventory and supply the repair shops. The repair shop must charge a labor rate that will allow them to remain in business. The technicians must be paid an hourly wage that reflects their investment in training, certifications, and tools.
What’s not often passed onto the consumer are the costs of running a shop, which in this modern age, can be pricey. Regardless of size, a shop has expenses that have to be paid by the work generated. There are the obvious ones, like the rent, electricity, heat and other utilities.
Many shops carry their own parts inventory. Given the number of different years, makes, and models of vehicles on the road, this inventory must be broad. Sitting on this inventory is not cheap.
Well trained service personnel costs money, period. Usually, techs are classified as “A”, “B”, or “C” techs, and the more high-grade techs in a shop, the more it costs to pay them. In order to attract a high-grade technician these days, shops have to pay a good hourly rate or weekly salary. In addition, health insurance and other benefits such as a company car often go into the package to attract the class “A” technician.
These technicians have to go to school on a regular basis to keep up with new automotive technology. Without this training, techs cannot repair vehicles in the “book time” allotted for a particular service operation. (Not to mention the occasional “headache” job that comes along that every tech in town has had his/her hands on without success.) A repair shop usually pays for this training.
The last piece of the puzzle is the actual time the technician spends diagnosing and repairing the vehicle. The more complicated the vehicle system, the more difficult and time consuming it becomes to diagnose. While the onboard computers have some self-diagnostic capability, it is not as simple as “hooking up the machine to tell you what’s wrong.” Fault codes must be analyzed, computer data reviewed, and often times, specific electrical measurements must be taken from the affected system in order to determine the actual fault.
As you can see, there’s a lot more that goes into auto repair pricing than parts and labor.]]>
 Typical A/C system[/caption]
The High-pressure Side
All automotive air conditioning systems are (nearly) closed loops with a high-pressure side and low-pressure side. We’ll start with the high-pressure side as it leads from the engine to the passenger compartment.
Compressor: The compressor is a pump driven by a belt attached to the engine’s crankshaft. When the refrigerant is drawn into the compressor, it is in a low-pressure gaseous form. Once the gas is inside the pump, the compressor lives up to its name. The belt drives the pump, which puts the gas under pressure and forces it out to the condenser. Compressors cannot compress liquids, only gasses. You’ll see as we go through the system that there are other parts whose job it is to capture any water that accidentally makes into the AC loop.
Condenser: The condenser is basically a radiator, and it serves the same purpose as the one in your car: to radiate heat out of the system. The refrigerant enters the condenser as a pressurized gas from the compressor. The process of pressurizing the gas and moving it to the condenser creates heat, but air flowing around the twisting tubes of the condenser cools the refrigerant down until it forms a liquid again. Imagine steam cooling down and condensing back into water, and you’ve got the idea. The liquid refrigerant is now a high-pressure liquid and nearly ready to cool the car.
Receiver-Dryer: But first, the refrigerant needs to be prepped for the evaporator. As it moves out of the condenser, the liquid goes through a little reservoir installed in the line. This receiver-dryer contains desiccants, small granules that attract water. You’ve seen packets of desiccants in shoeboxes, where they do the same thing: attract water from the air to keep new shoes fresh and ready for your feet. (They’re usually labeled “Do not eat.”) In the receiver-dryer, they remove any water that has entered the system. If the water is allowed to remain and possibly form ice crystals, it can damage the air conditioning system.
That’s enough high-pressure for anyone, so let’s move on to the low-pressure side of the system.
The Low-pressure Side
Thermal Expansion Valve (TXV): Here, the system changes from the high-pressure side to the low-pressure side. If you were to touch this part of the system, you’d feel it change from hot to cold.
The high-pressure liquid refrigerant flows from the receiver-dryer through the expansion valve, where it is allowed to expand. This expansion reduces the pressure on the refrigerant, so it can move into the evaporator. The valve senses pressure and regulates the flow of refrigerant, which allows the system to operate steadily, but the moving parts of the valve can wear out and sometimes require replacement.
Some vehicles have an orifice tube rather than an expansion valve, but it serves the same purpose in allowing the refrigerant to expand and the pressure to be lowered before the liquid enters the evaporator. The orifice tube allows refrigerant to flow at a constant rate and has no moving parts, but it can become clogged with debris over time. Systems with an orifice tube automatically turn the AC system on and off to regulate the flow of refrigerant to the evaporator.
Evaporator: This is where the magic happens. While all the other parts of the system are located in the engine compartment, this one is in the cabin, usually above the footwell on the passenger side. It also looks like a radiator, with its coil of tubes and fins, but its job is to absorb heat rather than dissipate it.
Refrigerant enters the evaporator coil as a cold, low-pressure liquid, ideally at 32 degrees Fahrenheit (0 degrees Celsius), which is why you don’t want any water in the system. The refrigerant doesn’t freeze at this temperature, but it does have a very low boiling point. The heat in the cabin of the car is enough to make the R-134a in the evaporator boil and become a gas again, just like water turning back to steam. In its gaseous form, the refrigerant can absorb a lot of heat.
The gas moves out of the evaporator — and out of the passenger compartment of the car, taking the heat with it. A fan blowing over the outside of the evaporator coil blows cool air into the passenger compartment. The refrigerant in gas form then enters the compressor, where it is pressurized and the whole process starts all over again.
If the system uses an orifice tube, there will be an accumulator between the evaporator and the compressor. An orifice tube sometimes lets too much refrigerant into the evaporator and it doesn’t all boil. Since the compressor cannot compress liquid, only gas, the accumulator traps any excess liquid before it can get into the compressor.
The evaporator also takes humidity out of the air in the car, which helps you feel cool. Water in the air condenses on the evaporator coil, along with dirt and pollen and anything else floating around in the cabin. When you stop the car and see water dripping underneath, it’s probably the water from the AC evaporator and nothing to worry about.
We’ve all heard about “recharging the A/C,” so we’ll take a quick look at that next.
Recharging a Car’s A/C
Most of us start seeing ads in the spring for car repair shops offering deals on recharging your car’s air conditioning in time for the coming summer. Which makes us ask, what is recharging the A/C? Is it required, like an oil change? Does my car’s air conditioning need to be recharged? Is this another scam that repair shops can pull on unsuspecting customers?
The answer to that last one is definitely no; recharging the A/C is not a scam. It simply means that fresh refrigerant is added to the system. If the refrigerant is a bit low, it can be topped off, the same as if you were a bit low on oil in the engine. If it’s really low, though, whatever refrigerant is still in the system needs to be drained out and replaced. This process of clearing out the system and adding new fluid is called recharging.
In either case, you’ve lost some refrigerant, which isn’t so great. Even though R-134a is better for the environment than Freon, the Environmental Protection Agency would rather not have any air conditioning refrigerant leaking into the soil and rivers. If you’re going to have the system drained and recharged, the EPA recommends having the technician take a look at the system to find the source of the leak and fix it. They don’t require the repair, but they’d really, really like you to have it done.
This article has talked a lot about R-134a as a replacement for big, bad Freon, but there are others that have been approved by the EPA, too. R-134a has the distinction of being the refrigerant most tested and recommended by manufacturers, but there are others with names like Free Zone, Freeze 12, and Kar Kool that the EPA will allow in automotive air conditioning systems.
Click Here to learn about the new refrigerant R1234yf
Typical A/C system[/caption]
The High-pressure Side
All automotive air conditioning systems are (nearly) closed loops with a high-pressure side and low-pressure side. We’ll start with the high-pressure side as it leads from the engine to the passenger compartment.
Compressor: The compressor is a pump driven by a belt attached to the engine’s crankshaft. When the refrigerant is drawn into the compressor, it is in a low-pressure gaseous form. Once the gas is inside the pump, the compressor lives up to its name. The belt drives the pump, which puts the gas under pressure and forces it out to the condenser. Compressors cannot compress liquids, only gasses. You’ll see as we go through the system that there are other parts whose job it is to capture any water that accidentally makes into the AC loop.
Condenser: The condenser is basically a radiator, and it serves the same purpose as the one in your car: to radiate heat out of the system. The refrigerant enters the condenser as a pressurized gas from the compressor. The process of pressurizing the gas and moving it to the condenser creates heat, but air flowing around the twisting tubes of the condenser cools the refrigerant down until it forms a liquid again. Imagine steam cooling down and condensing back into water, and you’ve got the idea. The liquid refrigerant is now a high-pressure liquid and nearly ready to cool the car.
Receiver-Dryer: But first, the refrigerant needs to be prepped for the evaporator. As it moves out of the condenser, the liquid goes through a little reservoir installed in the line. This receiver-dryer contains desiccants, small granules that attract water. You’ve seen packets of desiccants in shoeboxes, where they do the same thing: attract water from the air to keep new shoes fresh and ready for your feet. (They’re usually labeled “Do not eat.”) In the receiver-dryer, they remove any water that has entered the system. If the water is allowed to remain and possibly form ice crystals, it can damage the air conditioning system.
That’s enough high-pressure for anyone, so let’s move on to the low-pressure side of the system.
The Low-pressure Side
Thermal Expansion Valve (TXV): Here, the system changes from the high-pressure side to the low-pressure side. If you were to touch this part of the system, you’d feel it change from hot to cold.
The high-pressure liquid refrigerant flows from the receiver-dryer through the expansion valve, where it is allowed to expand. This expansion reduces the pressure on the refrigerant, so it can move into the evaporator. The valve senses pressure and regulates the flow of refrigerant, which allows the system to operate steadily, but the moving parts of the valve can wear out and sometimes require replacement.
Some vehicles have an orifice tube rather than an expansion valve, but it serves the same purpose in allowing the refrigerant to expand and the pressure to be lowered before the liquid enters the evaporator. The orifice tube allows refrigerant to flow at a constant rate and has no moving parts, but it can become clogged with debris over time. Systems with an orifice tube automatically turn the AC system on and off to regulate the flow of refrigerant to the evaporator.
Evaporator: This is where the magic happens. While all the other parts of the system are located in the engine compartment, this one is in the cabin, usually above the footwell on the passenger side. It also looks like a radiator, with its coil of tubes and fins, but its job is to absorb heat rather than dissipate it.
Refrigerant enters the evaporator coil as a cold, low-pressure liquid, ideally at 32 degrees Fahrenheit (0 degrees Celsius), which is why you don’t want any water in the system. The refrigerant doesn’t freeze at this temperature, but it does have a very low boiling point. The heat in the cabin of the car is enough to make the R-134a in the evaporator boil and become a gas again, just like water turning back to steam. In its gaseous form, the refrigerant can absorb a lot of heat.
The gas moves out of the evaporator — and out of the passenger compartment of the car, taking the heat with it. A fan blowing over the outside of the evaporator coil blows cool air into the passenger compartment. The refrigerant in gas form then enters the compressor, where it is pressurized and the whole process starts all over again.
If the system uses an orifice tube, there will be an accumulator between the evaporator and the compressor. An orifice tube sometimes lets too much refrigerant into the evaporator and it doesn’t all boil. Since the compressor cannot compress liquid, only gas, the accumulator traps any excess liquid before it can get into the compressor.
The evaporator also takes humidity out of the air in the car, which helps you feel cool. Water in the air condenses on the evaporator coil, along with dirt and pollen and anything else floating around in the cabin. When you stop the car and see water dripping underneath, it’s probably the water from the AC evaporator and nothing to worry about.
We’ve all heard about “recharging the A/C,” so we’ll take a quick look at that next.
Recharging a Car’s A/C
Most of us start seeing ads in the spring for car repair shops offering deals on recharging your car’s air conditioning in time for the coming summer. Which makes us ask, what is recharging the A/C? Is it required, like an oil change? Does my car’s air conditioning need to be recharged? Is this another scam that repair shops can pull on unsuspecting customers?
The answer to that last one is definitely no; recharging the A/C is not a scam. It simply means that fresh refrigerant is added to the system. If the refrigerant is a bit low, it can be topped off, the same as if you were a bit low on oil in the engine. If it’s really low, though, whatever refrigerant is still in the system needs to be drained out and replaced. This process of clearing out the system and adding new fluid is called recharging.
In either case, you’ve lost some refrigerant, which isn’t so great. Even though R-134a is better for the environment than Freon, the Environmental Protection Agency would rather not have any air conditioning refrigerant leaking into the soil and rivers. If you’re going to have the system drained and recharged, the EPA recommends having the technician take a look at the system to find the source of the leak and fix it. They don’t require the repair, but they’d really, really like you to have it done.
This article has talked a lot about R-134a as a replacement for big, bad Freon, but there are others that have been approved by the EPA, too. R-134a has the distinction of being the refrigerant most tested and recommended by manufacturers, but there are others with names like Free Zone, Freeze 12, and Kar Kool that the EPA will allow in automotive air conditioning systems.
Click Here to learn about the new refrigerant R1234yf
1. The first example is a bolt that is loose, with no torque applied — unstretched. 2. The second example is a bolt that is torqued to specification. There is a slight amount of stretch, but not enough to change metal/alloy properties of the bolt and it returns back to its original shape and is ready for retorquing. 3. The third example is a typical of an over-torqued bolt. Note that the bolt has not only stretched but stretched to the point of changing the properties and yield strength of the bolt. The bolt now has a much lower tensile/yield strength and allows the bolt to flex, generate heat and fatigue. A bolt that has been over-torqued will be prone to cracking, shearing, loosening, or breaking off which can result in damage to the wheel and other related components. Improperly torqued lug nuts or bolts can also result in: · Warped brake rotors — brakes grabbing, pulsating or overheated. · Damage to the lug nut seating surface of alloy wheels. · Wheel hub damage — threaded holes stripped out. It is also important to tighten lug nuts or bolts incrementally to the final torque specification, and doing so in the proper sequence.
Regular preventive maintenance is probably the most important thing you can do as a car owner to keep your ride happy and save money on repairs in the future. However, not everyone agrees on what preventive maintenance is, what you should do, and when you should do it. Let’s clear that up, and give you some tips that’ll apply to any vehicle. Anyone who’s ever worked on cars or spent a ton of money getting their car repaired will tell you: Don’t ignore preventive maintenance. The basics, like changing your oil, checking your tire pressure, and getting scheduled inspections and work done are like getting regular checkups at the doctor. They keep you healthy and give you—and the experts—a chance to catch anything serious before it becomes a major problem. With your car, that can save you thousands. First, Read Your Owner’s, Manual Pay attention to your owner’s manual. Regardless of the vehicle you drive, your regular maintenance schedule is inside it, and you’ll never fall for old car myths like, “You should change your oil every 3,000 miles,” (unless of course, your manual says you should, and odds are it doesn’t). You will, however, discover how often your manufacturer really does suggest you change your oil (it can vary widely by vehicle), your filters, any drive or timing belts in your vehicle, and more. You’ll even find out whether you’re putting the right gas in your vehicle or whether you’re using the right kind of oil in the first place. Seriously—you wouldn’t fire up a complicated piece of technology or a massive new home appliance without checking the manual to make sure you know what you’re doing. Most car lovers already know how important this is, but it’s still important even for people don’t consider themselves interested in how their car works. If you’re using the wrong oil, for example, or filling a car that calls for higher octane fuel with the lowest octane stuff you can buy, you may run the risk of voiding your warranty, and worse, causing damage that’ll cost more to fix than you’d save by using the cheap stuff. Preventive Maintenance Every Vehicle Needs. When we covered the ways you can save serious money on car repair, more than a few people pointed out that preventive maintenance is probably one of the biggest ways you can save money—not actively, but in the long term. Spending a little money now on these basics will save you from more costly repairs later on: · Do your own inspection. It’s basic, but give your car a once-over periodically so you catch anything that looks out of the ordinary. Make sure all your lights are working. Check the air pressure in your tires every month or so (and buy a cheap tire air pressure gauge and keep it in the glove compartment). Doing so is good for your tires, gets you better mileage, and saves you money in gas if you discover that the pressure is off. Listen for any strange sounds, inside and out. Make sure your tires have enough tread. You can use a penny to do it, or look out for the wear indicators on the tire treads. If anything’s out of the ordinary, don’t ignore it. · Learn to check your fluids. Even if you don’t ever learn how to change your antifreeze, power steering, coolant, or even your wiper fluid (although seriously, don’t let someone charge you to change wiper fluid), you should learn how to check those fluid levels. In some cases, you can see the tank level directly, but most have gauges or dipsticks you can pull out to check current levels against a notch that indicates optimal levels. Even if your owner’s manual doesn’t have much to say about checking your transmission fluid or antifreeze, don’t be afraid to open the hood and see if you can find it. If you’re running low, add more (if you can) or get it changed. Most importantly,never ignore a leak. · Inspect and get your timing and serpentine belts replaced when necessary. Many people will tell you to get your timing belt replaced every 60,000 miles or so, and your serpentine belt replaced every 40,000 miles, give or take. Again, your owner’s manual will offer real numbers for your type of vehicle. If you can’t find the manual, look around online. You’ll probably find the actual recommendation for your car. Use it as a guideline, and ask your mechanic to inspect the belts when it gets time to replace them mileage-wise. If they’re still in good shape, don’t bother, but if they’re worn out, get them replaced before they fail. If you wait and those belts do fail, you’ll break down, and the damaged belt can damage other accessories, making the repair even more expensive. · Check your oil and get it changed regularly. Whether your car has a dipstick to check the oil’s color and oil level or the dipstick has been replaced with an electronic gauge, you should know how to check it. Knowing the difference between clean oil and muddy, murky oil will save you a ton on unnecessary changes and gives you a way to tell if something’s wrong with your engine (e.g. the oil looks terrible but you just had it changed). It’s hard to make a universal recommendation for how frequently you should change your oil, but the answer is—as we mentioned—in your owner’s manual. Don’t just blindly follow the 3,000 mile myth though—for most vehicles it can be as high as 10,000 miles, depending on the oil your vehicle calls for (something else that’s in the manual). · Check your battery and clean the contacts (if necessary). Most batteries these days don’t require much in the way of maintenance, but you should know where it is and check it to make sure it’s not leaking and there’s no mineral or other buildup on the contacts. If there is, clean it off with a battery cleaning brush. It will set you back a couple of bucks at any auto parts or department store. Buy one and keep it in the trunk. While you’re at it, consider buying a cheap battery tester or jump starter. You’ll never need to call someone or wait for AAA (or a friendly passerby) to give you a jump. · Replace your windshield wipers when the view gets streaky. It may seem silly, but I’ve known several people who just ignored their wipers until they got them replaced as part of a bigger job. Wipers are cheap and easy to replace yourself. Don’t wait until you can barely see through your windshield. Your visibility is important, and you wouldn’t wait until you saw an optometrist to clean your glasses, would you? While you’re at it, give your windshield a good cleaning inside and out—if it’s hard to see, the problem may be inside, not out. · Replace your cabin air filter. Replacing a cabin air filter is probably one of the easiest things you can do to keep your car comfortable. Most vehicles make the cabin air filter easily accessible and replacing it is as easy as opening a box. You can get a fitting filter at any auto parts store. It may not be critical to your car’s operation, but it’s easy, it makes the ride more pleasant, and it’s a repair you’ll never have to pay someone else to do. · Replace your engine air filter. Getting to the engine air filter may be a little trickier depending on the vehicle you have, but replacing it regularly is important. Your owner’s manual will give you a mileage estimate for how frequently you should replace your engine air filter, but if you can get to it, check it. If it’s dirty, replace it. If you drive a ton, especially in stop-and-go traffic or have a long commute, your engine air filter may get dirtier faster than someone who drives open roads or only drives around on the weekends. If you need help or your owner’s manual doesn’t lay out exactly how to do it (although it should), you can easily find help online. · Get your tires rotated and balanced, and your alignment checked. Your manual will tell you how often to do this, and it’s important to do to make sure your tires wear evenly and your car drives smoothly. You can make your tires—which are expensive to replace all at once, by the way, take it from someone who’s done it several times—last much longer by getting them rotated and balanced. Your alignment is just as important. If you’re fighting your car to keep it straight, that’s a bad situation that’s easily corrected. · Change your spark plugs. If your spark plugs are worn out or covered in build up, your engine isn’t working efficiently. That can cost you money in fuel for one, but it can also lead to a breakdown. It may sound daunting, but in some cases checking and replacing them isn’t that difficult. If you don’t feel like doing it yourself (or it’s a big and complicated job for your vehicle), follow your manual’s recommendation and get them changed regularly—for most standard copper spark plugs and vehicles, that’s around 30,000 miles (but again, it varies – some iridium plugs can last up to 100,000 miles). These are just a few things that every vehicle needs and almost all of them are things you can do yourself. We can’t stress enough the importance of checking your owner’s manual for anything we may have overlooked here, or anything specific to your vehicle. If you don’t have your manual, you can find it pretty easily online.]]>
How a mass air flow sensor works (my view) The MAF (mass air flow) sensor is mounted in a vehicle’s engine air intake tract and its job is to measure the volume and density of air being drawn into the engine. The MAF (mass air flow) sensor is basically a little heater which heats up to a predetermined temperature that is monitored by the PCM when the PCM detects that the actual MAF sensor temperature is not within the predetermined expected range of the calculated MAF value it sets a Malfunction indicator lamp (MIL) illumination (a.k.a. check engine light) How a mass air flow sensor really works A mass air flow sensor has a small electrically heated wire (hot wire) and a small temperature sensor installed close to the hot wire. The temperature sensor measures the temperature of the air near the hot wire. When the engine is idling, a very little air flows pass the hot wire, so it takes very small electrical current to keep the wire hot. When you press the gas, the throttle opens allowing more air to flow over the hot wire. The passing air cools the hot wire down; the more air flows over the wire, the more electrical current is needed to keep it hot. The amount of this electrical current is proportional to the amount of the air flow. A small electronic chip installed inside the air flow sensor translates the amount of this electrical current into a digital signal that is sent to the engine computer (PCM). The PCM uses the air flow signal to calculate the proper amount of fuel injected into the cylinders in order to keep the air/fuel ratio at the optimal level. This is needed to keep the exhaust emissions low without sacrificing the engine performance. In addition, the PCM uses the air flow readings to determine the shift points of the automatic transmission; so if the air flow sensor doesn’t work properly, the automatic transmission might shift gears differently. Note: Some MAF sensors also incorporate an air intake temperature sensor, which is another value used by the PCM for optimal engine operation. Closely related MAF circuit trouble codes include: ⦁ P0100 Mass or Volume Air Flow “A” Circuit Malfunction ⦁ P0101 MAF Circuit Range/Performance ⦁ P0102 Mass or Volume Air Flow “A” Circuit Low Input ⦁ P0103 Mass or Volume Air Flow “A” Circuit High Input ⦁ P0104 Mass or Volume Air Flow “A” Circuit Intermittent Note: other codes may be present if you have P0100 codes. You may have misfire codes or O2 sensor codes, so it’s important to take a “big picture” look at how the systems work together and effect each other when doing a diagnosis. P0100 codes Symptoms may include ⦁ Malfunction indicator lamp (MIL) illumination (a.k.a. check engine light) ⦁ Rough running engine ⦁ Black smoke from tail pipe ⦁ Stalling Engine hard start or stalling after it starts ⦁ Possible other driveability symptoms Possible Causes ⦁ Dirty or contaminated mass air flow sensor ⦁ Failed MAF sensor Intake air leaks ⦁ MAF sensor electrical harness or wiring problem (open, shorted, frayed, poor connection, etc.) ⦁ Clogged catalytic converter on some models (GMC/Chevrolet mainly)]]>